
Founder of LearnDataSci
Beginner's Guide to Using Databases with Python: Postgres, SQLAlchemy, and Alembic
LearnDataSci is reader-supported. When you purchase through links on our site, earned commissions help support our team of writers, researchers, and designers at no extra cost to you.
First learning how to program in college, databases were one of those things that seemed like a black box. Everyone learns how to store some data in a simple text file or CSV, but how do you transition to a full SQL database on a server?
Whether you have a project you want to add a database to or you just want to learn and practice with SQL databases, I'll walk you through how to set up a PostgreSQL database locally and how to work with it in Python.
Find all the code for this tutorial on GitHub.
You should already know:
Python – You should be comfortable with functions, classes, methods, lists, tuples, and datetimes – learn on Coursera
Basic SQL – You should have basic familiarity with column data types and how to use expressions like CREATE TABLE, SELECT, WHERE, AND, OR, ORDER BY, LIMIT, and LIKE.
See the UC Davis' SQL for Data Science course on Coursera or Dataquest's SQL section
You will learn:
How to:
- Install a Postgres server locally and create a database
- Use Python with SQLAlchemy to connect to the database and create tables
- Use Python with SQLAlchemy to insert data and query the database
- Change models models and migrate the database with Alembic
SQLite vs. PostgreSQL
SQLite is often everyone's first starting point for databases, and it's still one of the best tools to use for many use cases.
The biggest difference between SQLite and Postgres — or other servers like MySQL — is that SQLite is just a file that you can access with SQL and Postgres is a server that you interact with.
All SQLite requires is a simple Python library to work with, whereas Postgres requires a significant download and install to utilize locally.
To make the comparison more concrete, let's just work with a SQLite database since it's so easy. First we'll import the sqlite3 library and make a connection to a database file:
import sqlite3
conn = sqlite3.connect('database.db')With that one line we have created the database.db file in our directory and made a connection, which now use to run SQL queries.
In a lightweight project you might just use raw SQL queries, so let's create an example table for books and insert a single book row:
from datetime import datetime
conn.execute("""CREATE TABLE IF NOT EXISTS books (
title TEXT,
author TEXT,
pages INTEGER,
published INTEGER
)""")
values = ('Deep Learning',
'Ian Goodfellow et al.',
775,
datetime(2016, 11, 18).timestamp())
conn.execute("""INSERT INTO books VALUES (?, ?, ?, ?)""", values)Now we can query the books table and retrieve our book:
r = conn.execute("""SELECT * FROM books""")
r.fetchall()[('Deep Learning', 'Ian Goodfellow et al.', 775, 1479445200)]As you can see, we've easily created a database, created a table, inserted a row, and extracted that row in short order.
SQLite is superb in this way. It's very quick to add to a project and is often easier to deal with than storing data in CSVs. You can even view this database in a browser using DB Browser. So why go to Postgres?
Why use Postgres
Postgres is a totally free, open-source database and supports many powerful features that are absent in SQLite. For example:
Server-based
Because Postgres is usually on a server in the cloud, like on Amazon or Google, any number of users or apps can connect to it at once and perform operations.
For example, imagine you're working with someone in a different country; how would you both be able to interact with a SQLite file? Where would you put it? How would you both be able to make a connection to it? For a Postgres server, each of you would get use a connection string that contains an IP and Port to the Postgres instance, allowing a socket connection to the database.
Data types
Postgres has a richer set of column data types than SQLite. Some notable examples of column types that Postgres has but SQLite doesn't are:
- JSON - store JSON arrays with ability to query against them
- MONEY - makes it easier to work with time series data, like that of stocks
- date and timestamp - ability to index and sort by dates and times, also useful for time series data
- inet/cidr - store IP addresses, which is useful for some web apps
Full text search
Postgres can easily store vector representations of text you're storing and allow super fast queries on it. This is handy for things like autocompleting search fields in websites, as well as data science projects using natural language processing.
Setting up Postgres is a fairly simple Windows download and install.
Setting up a Postgres server locally
Since a Postgres database in the cloud would cost money, let's set one up locally first for free. Connecting and working with a local instance is the same as working with one remotely. The only difference is that with a managed Postgres instance on a provider like Amazon or Google, you don't need to download and install anything.
I'm using Windows, so this article will detail using Postgres for Windows only. To download and install Postgres
- Go to the downloads page and select Windows in the list
- On the next page, click the link that says "Download the installer"
- On the next page, click "Download" in the Windows column of the latest version
- Run the .exe to install Postgres - just use all the defaults for installation, but skip launching StackBuilder at the end
Once you're through the setup, the Postgres application should be running. Now we can create a server and database.
Open pgAdmin
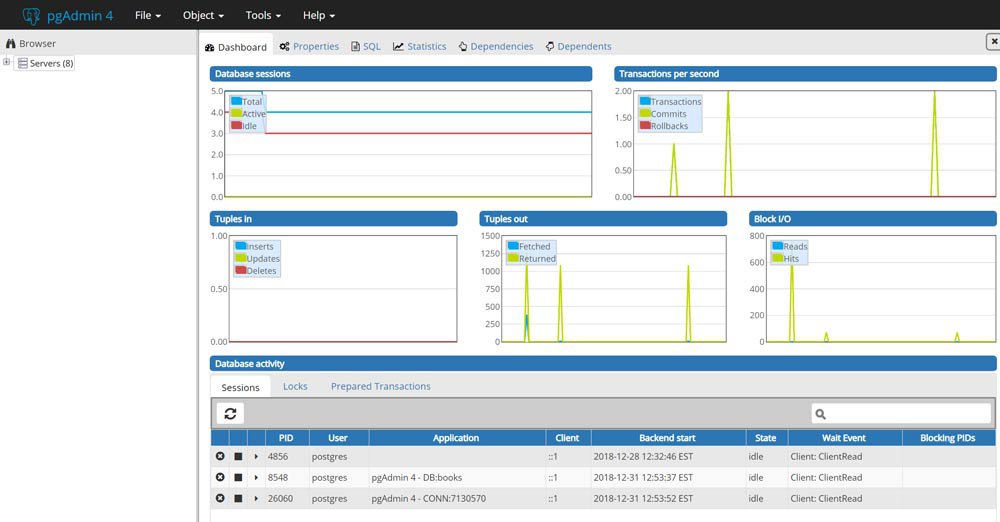
With your Postgres installation came a user interface called pgAdmin that lets you view your servers in a front-end application. Search Windows for pgAdmin and launch it. It should open a new browser tab on your localhost that looks like this:
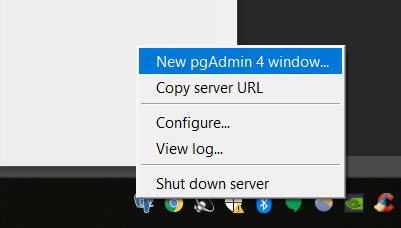
When you first launch pgAdmin it'll open a new window, but it'll also add an icon to your toolbar. If you ever close your window and need to open a new one, just right-click the blue elephant icon and click "New pgAdmin Window".
Make a Server
Let's give our new server a name of "local", use "localhost" as the Host name, and create an easy password (make sure to "save password"). Click Save and you should see a new server pop into the tree on the left.
Make a Database
Now that our server is created, in the tree expand the new "local" server, then right-click "Databases", hover over "Create", and select "Database". Under the "Database" field give it a name. I'm using the name "books" for this database.
In the tree, expand "Databases" and you should see the name of your new database.
In order to connect to this database in Python you will need to remember:
- The name of the database - books in our case
- The port - defaults to 5432
- The username - defaults to postgres
- The password you used when creating the server
When we create models and store data we'll be able to use the pgAdmin interface to view our tables and data like an Excel workbook and run SQL queries to explore and debug our project.
Now that we have a Postgres server and database ready, let's create a table and insert some data with SQLAlchemy.
SQLAlchemy Tutorial
SQLAlchemy is very commonly used with Flask applications, and is usually accessed through the flask-sqlalchemy library. Here, we'll be interacting with the sqlalchemy library directly, so if you're used to Flask, there's a few things that are a little different. Either way, everything here can be used by Flask as well without using flask-sqlalchemy at all.
What does SQLAlchemy do?
Remember when we used raw SQL to create a table and make a query above? Well, we don't have to do that anymore with SQLAlchemy (SQA for short).
SQA provides us with an abstraction layer above raw SQL and allows us to work with tables and queries as objects in Python. Usually, with SQA you don't write any raw SQL in Python anymore since SQA handles almost everything you would need as regular methods and functions.
Unfortunately, this makes it not a great way to learn SQL. It's highly recommended you learn how SQL works before using an abstraction of it.
Another downside is that it's sometimes hard to figure out how to achieve the same result with SQA as you would with a plain SQL query. Once you get the hang of the API, though, working with SQA is quite nice and all the code is very obvious and clean.
Let's start with how we define tables, a.k.a. models.
Defining a table
To create tables, or models, with SQA we create a Python class with the fields that define the table, then ask SQA to build those models in our database. Usually we put all these models in a models.py file at the root of our project. Here's what our project would look like right now:
project
models.pyWe will now recreate the books table from the SQLite example above, but this time using SQA.
First we import the base class from SQA that our models inherit from, then we import the Column object, and several data types for those columns.
After that, we create a Book class with table name books. This is the table name that will show up in Postgres.
In the Book class, we define variables where each one is associated with a Column object with a data type. We need to explicitly create an id column as the primary key, and each variable name we give the Column in Python will be the column name used in Postgres.
Here's our first model:
### models.py ###
from sqlalchemy.ext.declarative import declarative_base
from sqlalchemy import Column, Integer, String, Date
Base = declarative_base()
class Book(Base):
__tablename__ = 'books'
id = Column(Integer, primary_key=True)
title = Column(String)
author = Column(String)
pages = Column(Integer)
published = Column(Date)
def __repr__(self):
return "<Book(title='{}', author='{}', pages={}, published={})>"\
.format(self.title, self.author, self.pages, self.published)We need to inherit Base in order to register models with SQA. Without this, SQA wouldn't know anything about our models.
Notice we defined the __repr__ data model. As you'll see later, this will make it more obvious what row of the database we're printing out.
So how do we create this table in Postgres now? First we need to define our connection to Postgres and then we can call on SQA to create the tables.
Connecting to Postgres with Python
We need a driver called psycopg2 (pip install psycopg2) to let SQA obtain a connection to Postgres. Once installed, we can define our connection string like so:
### config.py ###
# Scheme: "postgres+psycopg2://<USERNAME>:<PASSWORD>@<IP_ADDRESS>:<PORT>/<DATABASE_NAME>"
DATABASE_URI = 'postgres+psycopg2://postgres:password@localhost:5432/books'The Scheme in the comment shows how to structure the connection string.
DATABASE_URI contains the parameters I'm using for my local database:
- my username is postgres
- my password is password
- the IP address is localhost (127.0.0.1)
- the port is 5432
- and the database name is books.
Just to be clear, our database's name is books, but the table name for Book is books. These are different things. The books database will contain many other tables besides books.
Usually, the connection string will reside in a config.py file and any secret values (like passwords) will be pulled from environment variables. The reason for this is to make sure secrets aren't accidentally displayed publicly, like on GitHub, at any point.
Let's now tell SQA about our connection so we can create the table.
Creating a table
For SQA to know about the Postgres instance, we create an engine using the connection string. To create an engine we use SQA's create_engine:
### crud.py ###
from sqlalchemy import create_engine
engine = create_engine(DATABASE_URI)engine now gives SQA the power to create tables so let's use it!
The Base class our models inherited has the definition of our Book model in its metadata, so to create a table we call the create_all with the engine:
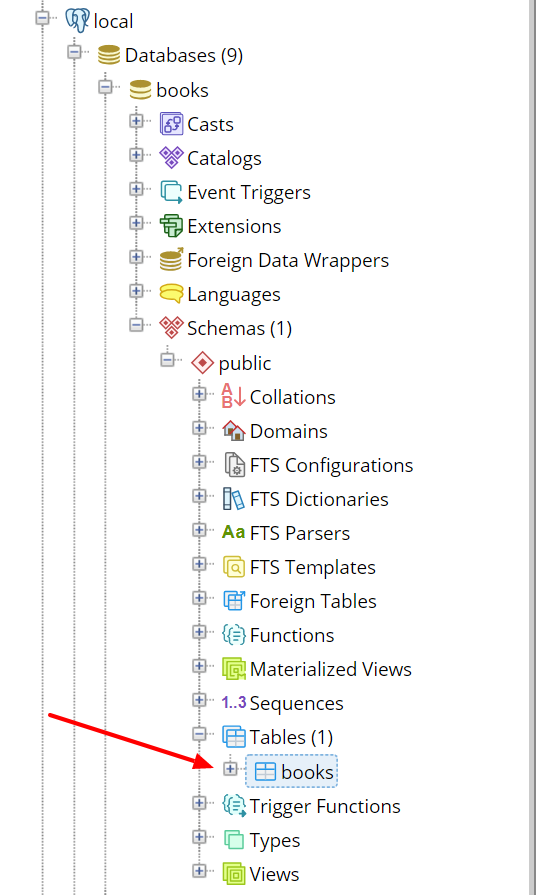
Base.metadata.create_all(engine)Created! We now have a books table in the books database. You can see this visually in pgAdmin:
To destroy this table (and all tables) in the database, we would run the drop_all method instead:
Base.metadata.drop_all(engine)When testing different models and relationships you'll often create and destroy databases until it's all sorted out. For this, we'll create a function to recreate the database:
### crud.py ###
def recreate_database():
Base.metadata.drop_all(engine)
Base.metadata.create_all(engine)This is assuming we have an engine in the global scope, which is usually the case.
engine and other database functions will usually reside in a file called db.py or crud.py, where CRUD is an acronym for Create, Read, Update, and Delete.
By now, our project looks like this:
project
config.py
crud.py
models.pyNow we need to create a session to interact with the new table we created.
Working with sessions
Technically, you could execute commands on the engine, but we really want to use a session. Session's allow you to form transactions with the database where you can add objects (rows) to the session and commit them when ready. If any errors occur, you rollback the session to its previous state and nothing is stored.
Sessions also hold any data you've queried from the database as Python objects. You can make changes to the objects in the session and commit back to the database if needed. Having to do all of this with raw SQL and parsing would be quite a task, but sessions make it easy.
To make a session, we use the sessionmaker class with engine to return a session factory:
### crud.py ###
from sqlalchemy.orm import sessionmaker
Session = sessionmaker(bind=engine)Now, we create individual sessions off of the global Session:
s = Session()The global Session object is a factory for individual sessions (s) which lets us bind our engine once and have clean session states whenever we need.
Session and engine will usually be defined globally at the top of the db.py or crud.py, and whenever we wish to interact with the database, we import Session and make a new s to work with — you'll see a better way to do this in the last section.
One thing you need to make sure is to always close the session when you're done using it to free connections and resources:
s.close()Keep sessions open will also prevent you from recreating the database. If you see the recreate hanging, this is probably why.
Now that we have a session, let's insert a book into our table.
Inserting rows
We'll create the same book that we did in the SQLite example, but this time using our model class:
book = Book(
title='Deep Learning',
author='Ian Goodfellow',
pages=775,
published=datetime(2016, 11, 18)
)All we're doing here is instantiating the class like we normally would in Python.
Notice that we can pass a datetime without needed to convert to a timestamp. SQA will convert the Python datetime into the Postgres Date column format.
We are ready to add book to the database. Let's recreate the database (since we destroyed it) and recreate a session (since we closed it):
recreate_database()
s = Session()Now it's as simple as adding the object to the session and committing:
s.add(book)
s.commit()You can check pgAdmin and see that there's now a book in the table.
But let's also query it with the session to confirm.
Querying rows
Using the query method from the session object, we pass the model we want to query and then get the first() item — which is the only item right now:
s.query(Book).first()<Book(title='Deep Learning', author='Ian Goodfellow', pages=775, published=2016-11-18 00:00:00)>The query above is essentially the same as that SELECT statement we made in the SQLite example, except now with no SQL on our part. Notice the formatting of the printed book object due to our __repr__ we defined in the model.
This is a very basic query since there's only one row in the table, so let's add a few more books to see some more advanced features.
To avoid duplicate entries, let's close any open sessions and recreate the database and session:
s.close_all()
recreate_database()
s = Session()I made a YAML file containing the five most recommended data science books, so we can parse it with pyyaml (pip install pyyaml) and insert each into the database.
When loading YAML using the yaml library, each book will pop up as a dict. This let's us directly unpack that dictionary into our Book model using ** since it has the same attributes:
import yaml
for data in yaml.load_all(open('books.yaml')):
book = Book(**data)
s.add(book)
s.commit()Now we have five books in our table. Let's query like we did before but return all() instead:
s.query(Book).all()[<Book(title='An Introduction to Statistical Learning: with Applications in R', author='Gareth James, Daniela Witten, Trevor Hastie, and Robert Tibshirani', pages=426, published=2013-01-01)>,
<Book(title='The Elements of Statistical Learning: Data Mining, Inference and Prediction', author='Trevor Hastie, Robert Tibshirani, Jerome Friedman', pages=745, published=2009-01-01)>,
<Book(title='Pattern Recognition and Machine Learning', author='Christopher Bishop', pages=738, published=2011-04-06)>,
<Book(title='Machine Learning: A Probabilistic Perspective', author='Kevin Murphy', pages=1104, published=2012-08-24)>,
<Book(title='Deep Learning', author='Ian Goodfellow, Yoshua Bengio, Aaron Courville, Francis Bach', pages=775, published=2016-10-08)>]Filtering basics: WHERE
The most important functions for querying are filter and filter_by, which essentially perform a WHERE in SQL. Both methods achieve similar results, but generally filter_by is used for simpler queries whereas filter is a more verbose, but more readable method for complex queries.
To see the difference, here's using both methods to get the Deep Learning book from before:
r = s.query(Book).filter_by(title='Deep Learning').first()
print("filter_by:", r)
r = s.query(Book).filter(Book.title=='Deep Learning').first()
print("filter:", r)filter_by: <Book(title='Deep Learning', author='Ian Goodfellow, Yoshua Bengio, Aaron Courville, Francis Bach', pages=775, published=2016-10-08)>
filter: <Book(title='Deep Learning', author='Ian Goodfellow, Yoshua Bengio, Aaron Courville, Francis Bach', pages=775, published=2016-10-08)>Notice that filter_by uses a single = and doesn't need the Book class like in filter. For basic query like the one above, filter_by is very straightforward and quick for equality checks. If we need to do anything else, though, we need to use filter.
For example, what if we wanted to just ignore the case of the book's title? With filter we get more powerful functions for querying, such as ilike() for ignoring case. This is the same as the SQL ILIKE function and works like so:
s.query(Book).filter(Book.title.ilike('deep learning')).first() # doesn't work with filter_by<Book(title='Deep Learning', author='Ian Goodfellow, Yoshua Bengio, Aaron Courville, Francis Bach', pages=775, published=2016-10-08)>There's many functions like ilike() that you can use on columns of a model, most of which are the same word as in SQL.
Another example is the between() function for dates:
from datetime import datetime
start_date = datetime(2009, 1, 1)
end_date = datetime(2012, 1, 1)
s.query(Book).filter(Book.published.between(start_date, end_date)).all()[<Book(title='The Elements of Statistical Learning: Data Mining, Inference and Prediction', author='Trevor Hastie, Robert Tibshirani, Jerome Friedman', pages=745, published=2009-01-01)>,
<Book(title='Pattern Recognition and Machine Learning', author='Christopher Bishop', pages=738, published=2011-04-06)>]AND, OR
Inside of a filter, you can specify multiple conditions using the and_ and or_ operators, which both need to be imported.
Let's say we want all books that are over 750 pages and published after 2016. Here's how we would do that:
from sqlalchemy import and_
s.query(Book).filter(
and_(
Book.pages > 750,
Book.published > datetime(2016, 1, 1)
)
).all()[<Book(title='Deep Learning', author='Ian Goodfellow, Yoshua Bengio, Aaron Courville, Francis Bach', pages=775, published=2016-10-08)>]We can pass any number of arguments to and_ for filtering, and then pass and_ to the filter. If you had very large conditionals, you could pull the and_ out into its own block.
Now let's say we want any books that were published either before 2010 or after 2016:
from sqlalchemy import or_
s.query(Book).filter(
or_(
Book.published < datetime(2010, 1, 1),
Book.published > datetime(2016, 1, 1)
)
).all()[<Book(title='The Elements of Statistical Learning: Data Mining, Inference and Prediction', author='Trevor Hastie, Robert Tibshirani, Jerome Friedman', pages=745, published=2009-01-01)>,
<Book(title='Deep Learning', author='Ian Goodfellow, Yoshua Bengio, Aaron Courville, Francis Bach', pages=775, published=2016-10-08)>]Again, you can pass as many conditions as you want. In a later example we'll combine several together to wrap up this section, but first let's look at ordering.
ORDER BY
Ordering is simple: all we need to do is use the order_by() method and call desc() or asc() on the column to get that order:
s.query(Book).order_by(Book.pages.desc()).all()[<Book(title='Machine Learning: A Probabilistic Perspective', author='Kevin Murphy', pages=1104, published=2012-08-24)>,
<Book(title='Deep Learning', author='Ian Goodfellow, Yoshua Bengio, Aaron Courville, Francis Bach', pages=775, published=2016-10-08)>,
<Book(title='The Elements of Statistical Learning: Data Mining, Inference and Prediction', author='Trevor Hastie, Robert Tibshirani, Jerome Friedman', pages=745, published=2009-01-01)>,
<Book(title='Pattern Recognition and Machine Learning', author='Christopher Bishop', pages=738, published=2011-04-06)>,
<Book(title='An Introduction to Statistical Learning: with Applications in R', author='Gareth James, Daniela Witten, Trevor Hastie, and Robert Tibshirani', pages=426, published=2013-01-01)>]In this case, we ordered by the pages in descending order, in other words, books with the most pages end up at the top.
LIMIT
You might be able to guess some of these now since they are similarly structured, but here's how you do a LIMIT of two is SQA:
s.query(Book).limit(2).all()[<Book(title='An Introduction to Statistical Learning: with Applications in R', author='Gareth James, Daniela Witten, Trevor Hastie, and Robert Tibshirani', pages=426, published=2013-01-01)>,
<Book(title='The Elements of Statistical Learning: Data Mining, Inference and Prediction', author='Trevor Hastie, Robert Tibshirani, Jerome Friedman', pages=745, published=2009-01-01)>]Many methods are pretty obvious and easy to remember when you make the connection to SQL. Let's wrap it all up.
Wrapping up querying
To wrap up this section I want to put several of the features we talked about together into one query. It's a little contrived with such a small dataset, but I hope you can see how it all works for your own use case.
Let's say we want to return a result that matches following criteria
- books either less than 500 pages or greater than 750 pages long
- books published between 2013 and 2017
- ordered by the number of pages
- limit it to one result
Here's what we're looking at:
s.query(Book).filter(
and_(
or_(
Book.pages < 500,
Book.pages > 750
),
Book.published.between(datetime(2013, 1, 1), datetime(2017, 1, 1))
)
)\
.order_by(Book.pages.desc())\
.limit(1)\
.first()<Book(title='Deep Learning', author='Ian Goodfellow, Yoshua Bengio, Aaron Courville, Francis Bach', pages=775, published=2016-10-08)>In this example, we nested the or_ inside of the and_, but we also could have done a separate filter as well. You can stack filters, and like in the code above, it's common to dot methods onto new lines with a \. Multiple filters could look like this:
s.query(Book)\
.filter(...)\
.filter(...)\
.order_by(...)\
.limit()\
.all()Like anything else, there's many StackOverflow questions and answers about every possible method and use case for SQLAlchemy filters, so I won't make this section any longer. Knowing what to search for, though, is another benefit of learning SQL first!
Let's now move on to adding new columns to our existing model.
Modifying models and using Alembic for migrations
Let's say we wanted to add some new data to the Books model, such as a new column for the price of the book, but we can't just drop_all and create_all because now there's users relying on the database being available. If we recreated the database, we would have to go back and insert all of the data again. If there was any user generated data, we would lose it.
We could just go into pgAdmin and issue some SQL, but there's a better way to do it in Python and keep track of the changes.
This is what database migrations are for.
Using the Alembic library, we can auto-generate SQA code to transform the database from the old version into the new version. Each time a migration is performed, a script is created with details on how to convert the database to the new version (upgrade) and how to reverse the migration to the old version (downgrade).
The version of the models is tracked by a new table, called alembic_version, which is automatically created by Alembic in your database.
Essentially, this is how Alembic works with your models and database:
- You change a model in
models.py - You ask Alembic what's different about the models
- Alembic creates a
.pyscript to convert the models to the current definition - You tell Alembic to proceed with the upgrade
- Tables are changed and the current version is stored in the alembic_version table in Postgres
Let's initialize Alembic in the root of our project by installing alembic (pip install alembic) and running the following command to initialize Alembic in a folder called "alembic" in our current directory:
alembic init alembicThis created a new alembic folder and an alembic.ini file in our root directory. Our project structure now looks like this:
project
│ alembic.ini
│ config.py
│ crud.py
│ models.py
│
└───alembic
│ env.py
│ README
│ script.py.mako
│
└───versionsSetting up Alembic
Alembic needs to understand where our database server is and how our models are defined. To do this, we need to edit the env.py file.
First, we need to set the SQLAlchemy URL to our DATABASE_URI value in config.py. In alembic.ini there's a sqlalchemy.url value we can change, but since it's a .ini file, we can't use Python to import our config. Instead, we'll edit the env.py to grab the value from config.py.
Starting at line 12, you should see this in env.py:
fileConfig(config.config_file_name)Here, we'll set the sqlalchemy.url value from our config. In order for alembic to find our config in the root directory (project) we insert its path into the Python path first. After that, we can import config.py.
Here's what it should look like now:
fileConfig(config.config_file_name)
import sys, os
sys.path.insert(0, os.path.dirname(os.path.dirname(__file__)))
import config as my_config
config.set_main_option('sqlalchemy.url', my_config.DATABASE_URI)If you've never seen this path inserting code before, we get the root project directory — which is where config.py sits — by calling os.path.dirname on the __file__object twice. In this case, __file__ equals the path to env.py. The first dirname returns an absolute path that correspond to the alembic directory, and the second dirname returns the absolute path to the project directory.
This is one of those annoying things about Python. If you've ever seen a "ModuleNotFoundError: No module named 'config'" error, then it could be because the directory that the file resides in is not in the path, so Python has no idea where to find it.
Moving on, right below the previous edit to env.py, starting around line 21, you'll see where we need to tell alembic about our models:
target_metadata = NoneThe metadata comes from the Base we defined above in models.py. Remember Base contains all of the information about our models, so alembic will use this information to determine if a migration is needed.
Let's import our Base and set it to target_metadata. It should look like this now:
from models import Base
target_metadata = Base.metadataOnce these values are added, we can run a command to tell alembic our database exists and to start checking for migrations from this point forward:
alembic stamp headNow a new alembic_version table has been created in our books database to track the current version of our models.
Let's make a change to our model and perform the first migration.
First migration
We want to start tracking the price of each book, so let's go ahead and add that field to our model in Python:
### models.py ###
from sqlalchemy.dialects.postgresql import MONEY
class Book(Base):
...
price = Column(MONEY)
...We're using the MONEY data type from Postgres for this column.
Now that this is defined in our model, we ask alembic to autogenerate a migration script for us by calling the following:
alembic revision --autogenerate -m "Added price column"If you go to alembic > versions you should see the new migration script.In my case this is called c98ef4af563a_added_price_column.py, and contains details on how to upgrade and downgrade the database.
Similar to git, the -m let's us add a message to this version. Since we changed the model by adding a price column, that was the message I decided to use.
All that's left to do is perform the migration. First we need to make sure any open sessions in an interactive environment (like this notebook) are closed:
s.close_all()If you're running all of this through a script, you don't need to worry about closing anything at this point.
Next, we can run the migration command that will follow the upgrade() instructions autogenerated script:
alembic upgrade headAnd that's it! We've successfully added a new column to our table without any downtime.
If you use pgAdmin to take a look at the books table you'll see the new column in place.
Now, we can insert prices into this table.
Adding prices to books
There's a few ways we could go in and add prices to the books. One way would be to treat pgAdmin like Excel and just add the prices right into the database. Another way would be to update the YAML with prices and make a loop that queries the books and adds the price.
Since we have a small dataset, we could also make a very simple command line script that presents the title of the book and asks for its price.
We'll put this in a new file for command line scripts like this and call it cli.py:
### cli.py ###
s = Session()
books = s.query(Book).all()
for book in books:
price = input(f"Price for '{book.title}': $")
book.price = price
s.add(book)
s.commit()
s.close()To run this script, simply call python cli.py in the project directory and it'll ask you to input prices for each book.
After adding the prices myself, let's confirm the prices exist:
s = Session()
s.query(Book.title, Book.price).all()[('An Introduction to Statistical Learning: with Applications in R', '$49.56'),
('The Elements of Statistical Learning: Data Mining, Inference and Prediction',
'$56.81'),
('Pattern Recognition and Machine Learning', '$63.64'),
('Machine Learning: A Probabilistic Perspective', '$64.92'),
('Deep Learning', '$37.79')]In this query, all I was interested in was the title and price, so by putting those in the query, we can narrow the amount of data returned. If you start getting large tables or joins of tables, this is a good thing to do to reduce server/network load.
Now that we've seen the basics of working with models, sessions, queries, and alembic, I'd like to mention a helper that I always add to my projects.
Session helper
You might have noticed that we are constantly creating a session, adding to the session, committing the session, rolling back the session if there's an error, and finally closing the session. That's a lot of stuff to write every time you want to work with your database. This is a perfect use case for a context manager.
If you've ever opened a file with Python's with open(...) as f:, you've used a context manager. The with keyword ensures that a setup and teardown occurs when opening and closing a file. This is very similar to what we want to do with sessions, so let's make our own.
First we import the contextmanager decorator from contextlib and define a session_scope function. In this function, we'll open the session as normal and yield it to our program. We'll use the try except finally logic where if an exception occurs, we rollback the session — removing any changes — and raise. The session will always be closed no matter what due to the finally, but changes are only committed if the yield returns without exceptions.
Here's how that looks like:
### crud.py ###
from contextlib import contextmanager
@contextmanager
def session_scope():
session = Session()
try:
yield session
session.commit()
except Exception:
session.rollback()
raise
finally:
session.close()Now we can use a session to query and modify data like this:
with session_scope() as s:
book = s.query(Book).filter(Book.title.ilike('%introduction to statistical%')).first()
book.price = '67.98'
s.add(book)And just like that, the price for this book has been updated in the database.
Note that in ilike we can use % to match partial strings just like in regular SQL.
So from now on, you would import session_scope instead and work with that. Sometimes you might still need to use the engine or Session by themselves for more advanced operations.
Wrapping up
There was a lot of information in this article, and I hope you try it all out on your own to get a better idea of how it works. If you have a project you're working on right now that's using CSVs or SQLite, and you want to learn how to work with Postgres, then definitely consider switching.
I use Postgres, SQLAlchemy, and Alembic in almost every data collection, web scraping, and web application project I create. One difference being that in web applications, Flask is usually the web framework of choice and SQLAlchemy/Alembic are paired into the flask-sqlalchemy library. In that case, there's simpler commands for migrations.
Definitely take a look at the project code on GitHub to see the end stage of each file mentioned above, and feel free to ask any questions in the comments below.
Thanks for reading!